Tuesday, October 27, 2015

Sports ATC

There's not much to this "sports atc" I made for a swapbot swap. But since I'm such a Giants baseball fan (or rather, my husband), I decided I'd share it with you all. 


🔸The background is probably the most "artsy" part to the whole thing, and I made it by squeezing some alcohol inks on a plastic surface (one color at a time) and then smooched my glossy card-stock around in it. If you smooch it around multiple times and with multiple colors, you get more variations to it.

🔸Then I added my sequin waste.

🔸Followed by sequin string.

🔸And last, the Giants logo I printed and cut using my cricut. 

And it's ok that they didn't make the playoffs this year. If the pattern repeats, they'll win the World Series next year!

Sunday, October 25, 2015

Traveling Art Journal

This art journal was for a swap on swapbot. The swap called for a "mini" art journal. I didn't read the directions fully and I made mine the maximum size. I probably would have made it a bit smaller had I known better. 

The Cover:


The inside:


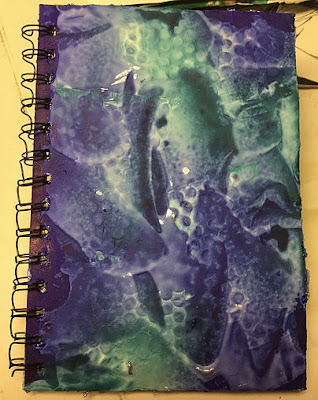
The front and back cover:

🔸I used chipboard for the front and back. I did them both the same.

🔸I smeared them with thick gesso, making it lumpy in places. 

🔸While it was still wet, I sprayed it with two colors of spray ink.

🔸My original plan was to embed some elements in the gesso. I started with sequin waste but it didn't sit right so I took it off but left the impressions they made.


Inside Cover:

🔸I printed my address information using my computer and printer. I attached it to the page. 

🔸I then spread glass bead gel around it and to the edges. 

🔸After it was dry, I painted it with metallic paints. First lavender, then I rubbed periwinkle in places with my finger. 

🔸Lastly, I covered my address area with "hard" modge podge. 


First Page:

🔸The prompt for the page was "numbers". So I incorporated my age on the page.

🔸I attached a book page to my cardstock.

🔸I watered down some green acrylic and painted my page. 

🔸I attached some borders I had to the top and bottom, leaving some room at the top for my name.

🔸The number "36" was made with some background paper I had made a few years ago. It was originally a paper grocery bag that I had used underneath making other projects so not to get paint on my counter. After it looked cool from all the different colored paints, I covered it with thick, clear embossing powder and melted it.

🔸I outlined my 36 on my page and painted lavender around it so it would be like a border for my number.

🔸I then outlined the lavender with gel pen.

🔸After that was dry, I glued on my "36". 

Are any of you in any other art journal swaps other than on swapbot? If so, I'd love to know about them. There are limited art journal swaps on swapbot and art journals are what I am into right now.

Friday, October 16, 2015

Altered Altoid Tin


This was made for a swap on swapbot. The swap name was Altered Altoid Tin. For years now, I have googled this project, but this is the first time I think I've actually ever made one. I am not sure how I decided to make it a bird theme, but I did. 

The first step in creating my little masterpiece, was of course to purchase an altoids tin. I believe it cost me three dollars at a gas station. I ended up putting the mints in a Baggie and giving them to my dad. Here's how the rest goes:

🔸 After buying the tin, my first step was to figure out what images I wanted to use. As I mentioned, I wanted it to have a bird theme. So I googled "vintage birds" and picked the image I used on the inside of the tin.

🔸 I just bought a cricket cutting machine and I envisioned cutting out the bird both on paper as well as chipboard. But apparently I didn't have the right blade to cut chipboard. So I ended up printing and cutting the image on cardstock, and then cutting just the shape onto two pieces of cereal box.

🔸 After I had three cut out shapes, I glued them all together with the printed image on top of course. This made my bird really sturdy, as if on chipboard. (I've since bought a deep cutting blade. Haven't tried it yet though) 

🔸 Next, I picked the outside image.

🔸 Using my two images, I went through my scrapbook paper, and found patterns I thought would match.

🔸 For whatever reason, I decorated the outside first by cutting my patterned paper to cover the top.

🔸 Before I glued it on, I painted the tin first with gesso, then pearlescent white.

🔸 After I glued on the blue paper, I cut my second bird image to fit the way I wanted it. I glued that on too.

🔸 Next I went around the bird image with a piece of white sparkly string. It's made by "May Arts". I got it on Amazon and it comes in a ton of colors.

🔸 After the string dried, I went around it with glitter glue.

🔸 When the glitter glue was mostly dry, I attached my white plastic flower. I got it in a grab bag package from tomorrowsunknown.com.

🔸 The last thing I did to my lid was surround the lip of it with white sequin string. It's hard to see in the picture, but it was a cool touch. 

On to the inside:

🔸 On the inside lid, I used the same paper as the top. I traced, cut, and glued it in place.

🔸 I had also found and printed a bird image for the inside lid.

🔸 For the frame, I used a plastic projector slide. I colored it using tan and orange alcohol inks. I did this by squirting the ink onto felt and then daubed it on the slide.

🔸 I glued the bird image and slide into place.

🔸 I used a musical background for the other side.

🔸 For the inside edges I used blue electrical tape. The color matched perfectly.

🔸 Before I stuck my bird in there, I placed my flowers where I wanted them and glued them in. 

🔸To make my bird "pop out" of the box, I glued foam squares to the back to lift it off the surface. It was perfect. 

🔸 I used some more electrical tape along the outside and underneath the bottom lid.

I really do love how the whole thing turned out. The pictures do not give it justice. 
Thursday, October 15, 2015

Halloween Tag


This tag was made for a swap on swapbot. One of the reasons I wanted to do this swap, was because I seem to have a ton of Halloween embellishments. I thought this would give me a chance to use some. Here's how I made it:

🔸 I started by cutting cardstock to the size the swap called for. I'll be honest, I don't remember the exact dimensions, but it was to be the size of a large Manila tag. For the background, and the bag of the tag too, I first painted it a dark orange.

🔸 When the dark orange was dry, I used two lighter shades of orange to paint bubble wrap and use it as a stamp on top of the darker color. I stamped it a few times, so the circles overlapped.

🔸 I had decided I wanted to use the ghost I picked out in front of a halloweenish background. So I searched the Internet till I found the right one. I did have to crop it to get the size I needed. Go iPads!

🔸 I also printed an orange moon for the spider to go on.

🔸 I used some German scrap borders to go around the dark scene.

🔸 Before I attached my ghost and spider, I painted both printed images with "Hard Coat Modge Podge".

🔸 I didn't have any orange or black thread or fibers, so I ended up using sequin thread.

I do like how it turned out, though it could of used a little more, if you know what I mean. 

Sunday, October 4, 2015

Autumn Journal Page

I haven't done a challenge from a challenge site for a little while now so I thought I'd give it a go again.

I always have to read the challenge sites carefully because the challenge rules are always different. A lot of them are cards only. I'm thinking about making cards again soon, but right now I'm into journaling.

I chose a challenge from "A Gem Of A Challenge". Their theme is autumn.


Here is how I made it:

🌀 I started making the background by mixing metallic gold and metallic bronze with gesso.

🌀 I had my 5 year old pick out a stencil and I stenciled the gesso mixture on my page.

🌀 Then I made a brown glimmer mist by using 25% brown metallic paint and the rest water. I also added a teaspoon of brown mica powder.

🌀 I sprayed it over the page after my gesso had dried.

🌀 While that was drying, I had my brand new Cricut cut out the leaves.

🌀 I painted the smaller ones with sparkle podge.

🌀 After my page was dry, I attached the mesh tape (you can get it at the dollar store in the automotive section) and the ribbon.

🌀 Since this was a journal page, I thought it could use more paint. So I painted the edges and along the ribbon with gold metallic acrylics. 

🌀 It took me a couple of different layouts before I decided to use the "live, laugh, love" words. I glued them on along with the big leaf and the smaller sparkly ones.

🌀 I finished it off by adding a rhinestone in the center of the leaves. 

Before I go, I wanted to show you a new way how I am keeping my ephemera:


Sticky photo albums! I ordered a couple more for my cut out ephemera too!

Friday, October 2, 2015

My Planner and Tutorial

Hey ya'll. I have decided to branch out a little from my usual posts and show whoever decides to read this what other things I've been doing.

For the past several years, I have become obsessed with planning. Well, planners, to be exact. At first I bought about six binder type planners: 


There are actually a few unaccounted for. Like socks in a dryer, I can't seem to keep track of all my stuff.

When I got these planners, I chucked the pages that came with, with the plan I would print my own.

I scoured the Internet in search of the perfect planner printable and I have to say there were many good ones. But none were perfect. 

About the time I was looking for the "perfect printable", I bought myself an iPad. It took awhile before I unlocked all it's wonderful creative abilities. But once I did, I was on to making my own "perfect printables". Soon I will make a page on this site with my printable creations. Here is an example of one: 


So you'd think I'd be set. But alas, I was not. The "perfect printable" I'd make would only be perfect for a week before my interests would change. Either that, or I'd just forget to "plan" anything. 


So once my interests took me back to planning, I'd rip out everything from my planner and start anew.

This was all fine and dandy, but one of the reasons I wanted to have a planner was to someday look back at them years from now.

And that brings us to about a week ago. That was when I had the epiphany of purchasing predated planners that would not be so easy for me to just rip out the pages. So I bought a few.

But then I got to thinking, what fun it would be to bind my own planner. That's when I got online and bought myself a "bind it all". So last Thursday, I went ahead and made my own weekly planner: 


Instead of taking the time to make my own weekly spread, I decided to go ahead and use one from Scattered Squirrel. It's a great printable. I then made my cover and back using my iPad and laminating machine. I bound it all together and am happy with how it turned out.

But wait, I'm not done. Every good, useable planner has some sort of book mark to take you to today. So I got creative, and made one.


But how do I move the book mark around and keep it in place at the same time" you ask? This is how I did it: After I laminated my bookmarks, I used the bind it all to punch the holes in it (you could use a regular hole punch if you're making one for a binder). Then, with a pair of scissors, I cut little slits from the hole to the edge so that I could sort of clip it into the wire rings of the binding. Now you can snap it in and out between the pages.

So that's my planner story and tutorial for ya. Any questions?